Handling large reactive forms in Angular
- Published On
- Read Time
- 6 min
- Updated On
- Oct 22, 2021
On This Page5 sections
This article is based on Angular 12 and will not be updated anymore (but will be kept for reference). Read my new article Handling large, typed reactive forms in Angular which is a rewrite of this one, uses the latest Angular version and strictly typed forms.
Update October 2021: The article has been rewritten and the demo on StackBlitz has been updated to use Angular 12.
Update March 2021: I wrote a follow-up article about data handling in large reactive forms: Data Handling in Angular Reactive Forms.
Angular Reactive Forms let you build complex forms in a convenient way, including features like form validation. I assume that you are familiar with Angular and Reactive Forms. If not, please go through the official guide first.
The problem
When you build a reactive form, you create a FormGroup with one or more FormControl in your component class, add some inputs in your template and bind the value to these form controls via formControlName. This works fine for smaller forms but business applications often require dozens of inputs, grouped into multiple areas and multiple steps with complex validation logic.
Doing everything in one component with a lot of (nested) form controls, validators and error messages will get messy pretty soon. That’s why you should split up your form into multiple components. Each component is responsible for a part of the form and a parent component brings it all together.
There are several ways to split a form into multiple parts. We’ll take a look at three of them.
The solutions
Control Value Accessor
The ControlValueAccessor (CVA) interface (see docs) allows you to build components that support reactive forms. If a component implements the interface you can use formControlName on that component.
<form [formGroup]="form">
  <!-- ChildComponent needs to implement ControlValueAccessor -->
  <child-component formControlName="child"></child-component>
</form>
It’s a clean approach and is probably a good way for building form field components, like a custom input field or a date picker. For our use case I personally do not recommend it for two reasons:
-
Complexity: The API is a bit unusual compared to what you normally do when working with components. For example, usually you use event emitters to communicate with the parent component. The CVA interface on the other hand expects functions to register callback functions instead of event emitters.
-
Resetting Form: The Control Value Accessor Interface does not support resetting a form. There is an issue on GitHub for that problem which was created 2017 and is still open.
If you want to learn more about the CVA read this article by Gugan Arumugam.
Read on to learn more about the second approach.
Parent provides FormGroup to child
The second approach is to create a FormGroup in the parent and provide it as input to all child components. The child components then can use that form group and add their controls or groups to the form. Because it’s an object all its state is shared between the parent and child.
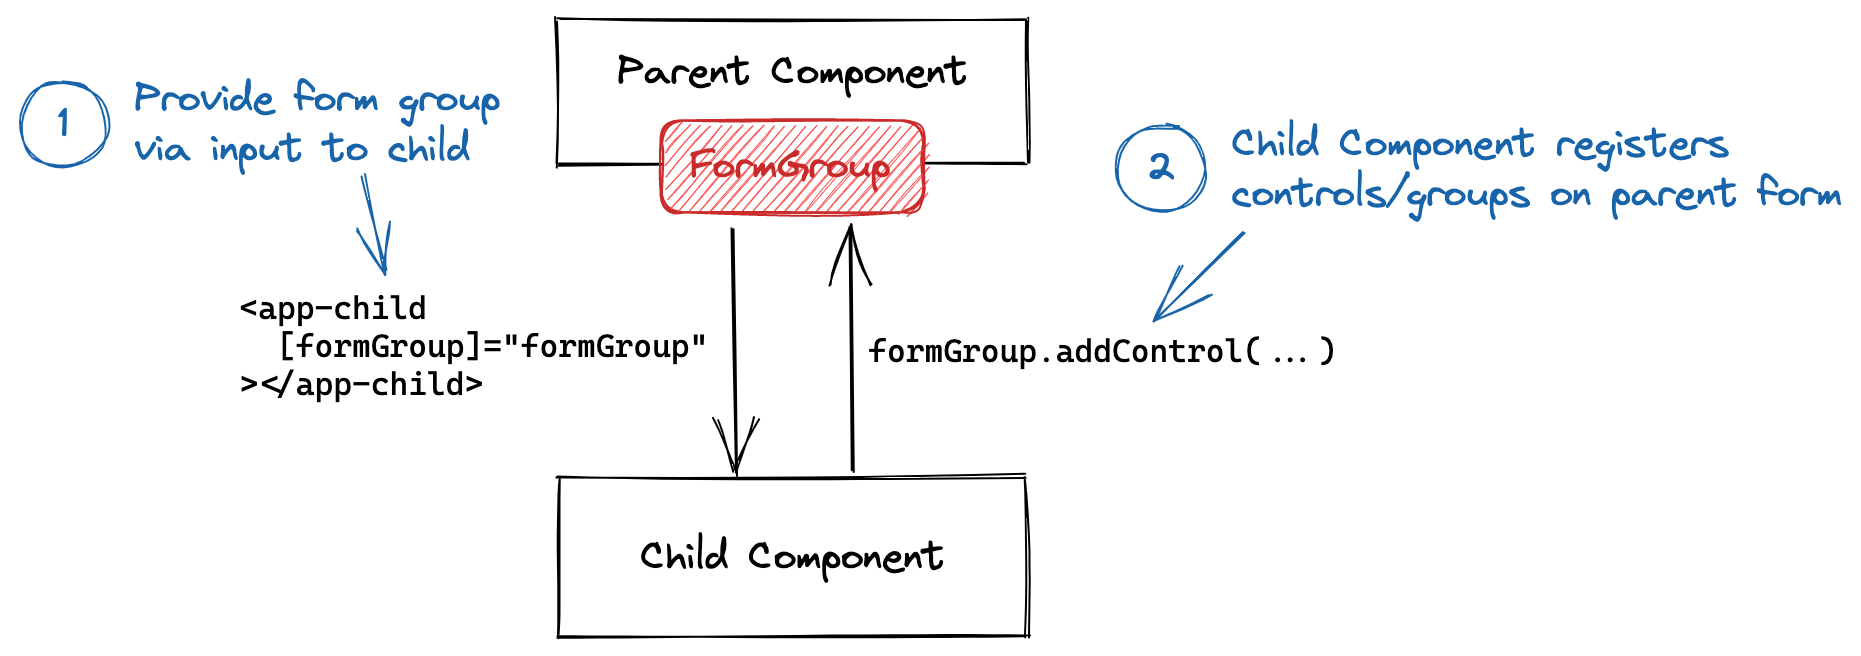
The parent provides the form group as input:
<child-component [formGroup]="formGroup"></child-component>And the child component uses the formGroup to add controls or groups.
export class ChildComponent implements OnInit {
  @Input()
  formGroup: FormGroup; // Access the parent form group

  ngOnInit() {
    // Extend the parent form group
    this.formGroup.addControl(...);
  }
}
This solution is easier to implement than the Control Value Accessor. However, it still has some downsides.
- Inputs / Data Flow: The child component receives an input value, the form group, and manipulates the object (by calling
addControl()) which should normally not be done. Data flows from top to bottom (parent to child) and should be treated as read-only. This principle is violated here. - Responsibility: The child components need to use the form group of the parent. They are not in control anymore about creating and managing their own form group.
- Naming conflicts: Each child component is responsible for adding their controls and groups to the shared form group. What if two child components choose the same name for a control or group?
This approach is described in detail in this answer on Stack Overflow.
Child provides FormGroup to parent (our approach)
The third approach and the one we are going to implement later is similar to the previous one but keeps the responsibility in the parent component — in a central place and easier to maintain.
The idea is that each child component creates its own form group and provides that form group via event to the parent. The parent can combine them into one large form group to manage the state, like checking if the form is valid or resetting the form.
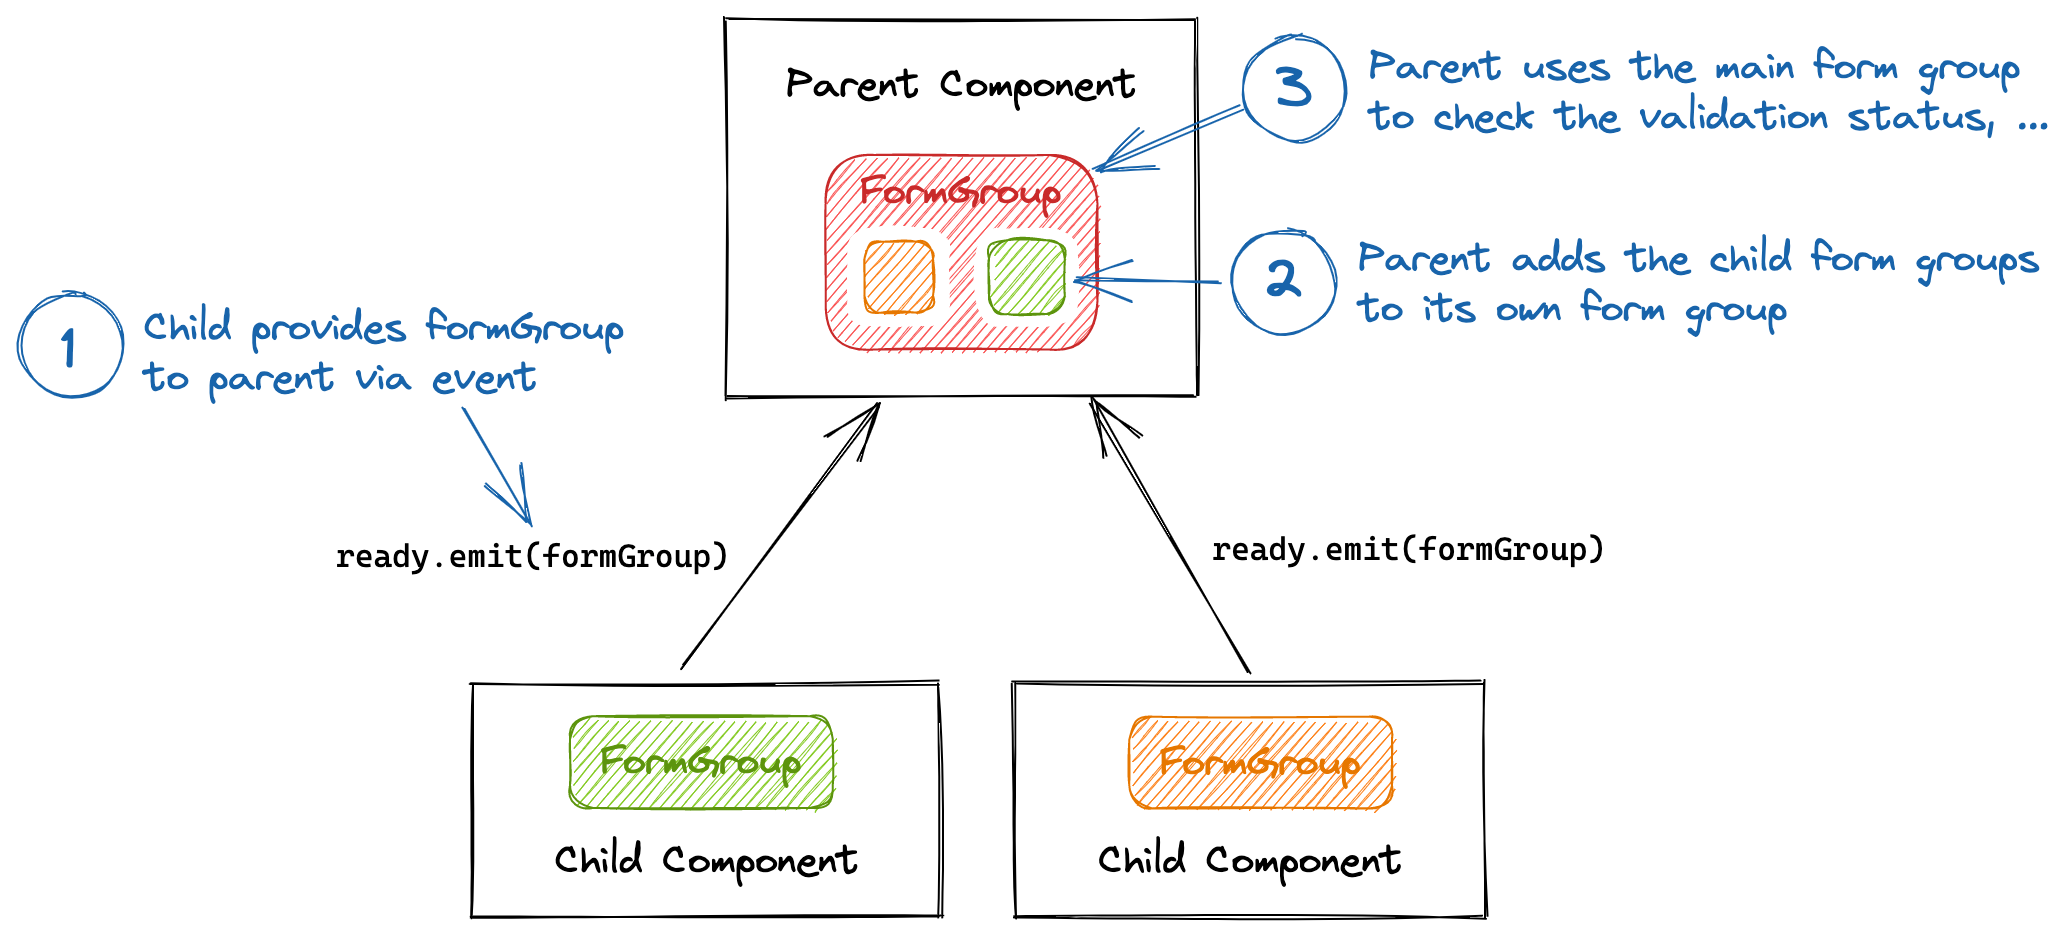
Compared to the second approach, this way the child component is completely independent of the parent. It does not need to manipulate input values and all children itself are independent of each other. There is no risk of a naming conflict because each child creates a form group and the parent adds them to the main form group with a unique name.
Now let us implement this approach.
Implementation
First we create a child component, let’s call it PersonalDataForm. The child component generates a new form group that it will use in the template and it emits an event in ngOnInit to provide that form group to the parent.
export class PersonalDataFormComponent implements OnInit {
  @Output()
  formReady = new EventEmitter<FormGroup>();

  form = this.fb.group({ ... });

  constructor(private fb: FormBuilder) {}

  ngOnInit() {
    this.formReady.emit(this.form);
  }
}
I omit the template here because it works as with any other reactive form.
Next we create the parent component with its own form group. It uses the form in the template and shows a submit button that is disabled until the form is valid.
export class AppComponent {
  form = this.fb.group({});

  constructor(private fb: FormBuilder) {}
}<form [formGroup]="form">
<!-- just an empty form for now -->
<button type="submit" [disabled]="form.invalid">Submit</button>
</form>Now we want to use our child component in the parent. We add it to the template, register an event handler for the formReady event and add the received form group to our parent form group.
<form [formGroup]="form">
  <app-personal-data-form
    (formReady)="addChildForm('personal', $event)"
  ></app-personal-data-form>
  <!-- ... -->
</form>export class AppComponent {
// ...
addChildForm(name: string, group: FormGroup) {
this.form.addControl(name, group);
}
}The parent adds the form group of the child to its own form group with the key “personal”. The parent component will choose a unique name for each child. This ensures that there are no naming conflicts and the child components don’t need to care about using unique names for their controls and groups.
When the form group of the child is added to the parent form group it will automatically update the validation status, the form value and other properties. If a child component has an invalid field this will be propagated to the parent form group and the submit button will automatically be disabled. Nice, isn’t it?
Demo
That’s it! We now have a reactive form with a child component and can add dozens of more child components and the parent component will still be clean and easy to maintain.
Here is a demo on StackBlitz with two child components and basic validation:
stackblitz.com/edit/large-reactive-forms
Summary
We discovered different approaches for creating Reactive Forms in Angular.
The solution we implemented allows us to build forms with multiple child components that have their own form group and are independent of each other and the parent component. The parent component still has a form group that gives it access to the form value, validation status and more.
Compared to the Control Value Access Interface it uses familiar component APIs (inputs and outputs), is easier to implement and more flexible.
Are you ready to dive deeper? Read my follow-up article Data Handling in Angular Reactive Forms.