Angular + Stitches: How to use CSS-in-JS in Angular
- Published On
- Read Time
- 7 min
- Updated On
- Jun 3, 2022
On This Page5 sections
The article has been updated for Angular 14 and the latest version of Stitches.
We’ll start with a short overview about styling in Angular. Then we’ll learn what Stitches is and what makes it a great library. And finally, we’ll create an Angular project and use Stitches to style our components.
Angular View Encapsulation
Angular supports encapsulated component styling out of the box. Components can be styled using CSS or SCSS.
// Your code ...
.danger {
  color: red;
}
// ... gets compiled into this
.danger[_ngcontent-pwx-c41] {
color: red;
}The component styles are part of the JS bundle (no separate CSS file except for your global styles) and are added into the head of your document as soon as your component is rendered.
However, there are some drawbacks:
-
Another language: You need to learn SCSS with variables, mixins, loops and more.
-
Global class names: Angular does not change your class names. If you integrate your application into a Micro Frontend with global styles, this may affect your components.
-
No type-safety: All your TypeScript code is type-safe. Your component templates are type-safe. Your CSS classes are … just a bunch of untyped strings. Nothing stops you from using an invalid class name in your template.
So there are good reasons for using CSS-in-JS.
Stitches
Stitches is a CSS-in-JS library. It’s primarily made for React, but the core is framework-agnostic. There are many benefits compared to other CSS-in-JS solutions but just to name a few:
Theming
Stitches uses CSS Custom Properties for your theme instead of relying on React Context as other CSS-in-JS solutions do. This is easier to use, more flexible and faster.
Tokens
You can create a theme by defining tokens for colors, spacing, font sizes and more. Then you use these tokens in your styles by prefixing them with a dollar sign. Like this:
const { css } = createStitches({
  theme: {
    colors: {
      primary: "blue", // Define your token
      // ...
    },
  },
});
const style = css({
color: "$primary", // Use your token
});Stitches will replace your token $primary with the CSS custom property for your primary color token. And the best thing: even if your style values are strings, you get autocompletion for your tokens:

Variants
Other CSS-in-JS solutions rely on props to create different styles for a component. Stitches on the other hand uses statically defined variants. A variant is a name and has one or more possible values with different styles for each variant.
const button = css({
  // ... (base styles)

  variants: {
    color: {
      primary: {
        backgroundColor: "$primary",
        color: "$onPrimary",
      },
      accent: {
        backgroundColor: "$accent",
        color: "$onAccent",
      },
    },
  },
});
The style above defines the variant color with the two possible values primary and accent. When using the styles you pass a value for each variant (here just the color variant).
button({ color: "accent" });And that is just a simple example. Stitches supports boolean variants, responsive variants, default values for variants and much more. And yes, variants are type-safe if you use TypeScript.
Note: The example above is very simple. If you are actually going to implement a button, take a look at locally scoped tokens.
Stitches in Angular
The core library of Stitches is framework-agnostic. We can install it in an Angular project to style our components. Let’s do this.
Install Stitches
Let’s first create a new Angular application, then install Stitches:
# 1. Create a new Angular project
ng new angular-stitches
cd angular-stitches/

# 2. Install Stitches
npm i @stitches/core
Note for older TypeScript versions: If your TypeScript version is lower than 4.4 (Angular 12 or below) you need to disable library checks in your tsconfig (skipLibCheck: true). That’s because Stitches relies on newer TypeScript features (see issue 754 on GitHub).
Create a theme
We then create a global theme. The createStitches function accepts tokens for colors, font families, font sizes, box shadows and much more. In addition, you can define media queries for responsive designs and other configurations like a prefix for all class names.
We keep it simple for now and just add some tokens.
import { createStitches } from "@stitches/core";

export const { css } = createStitches({
  theme: {
    colors: {
      text: "black",
      primary: "blue",
      onPrimary: "white",
    },
    fontSizes: {
      1: "0.875rem",
      2: "1rem",
      3: "1.125rem",
      4: "1.5rem",
      5: "2rem",
    },
    space: {
      1: "0.25rem",
      2: "0.5rem",
      3: "0.75rem",
      4: "1rem",
      5: "2rem",
    },
  },
});
Calling createStitches returns functions to create encapsulated styles, global styles, keyframes and more. For now, we just re-export the css function to create our component styles.
Build a basic component
Now let’s add some basic styling to our component.
Stitches creates CSS custom properties for our tokens. We can use our tokens by prefixing them with $
and Stitches will replace them with var(...) to use the corresponding custom property.
import { css } from "src/styles";

const $title = css({
  margin: "0 0 $5 0",
  fontSize: "$5",
  color: "$primary",
});

const $intro = css({
  margin: 0,
  fontSize: "$3",
});
I like to prefix my style objects with $ (like $title) to avoid variable shadowing. You can choose your own prefix (like styledTitle) or don’t use a prefix at all.
Stitches does not care about that.
Stitches will not add any CSS to our document until we call the function that css returned.
Let’s add our two styles as a property to our component and use it in our template.
const $title = css({ ... });
const $intro = css({ ... });
@Component({
selector: "app-root",
template: `
<h1 [ngClass]="cn.title">Angular + Stitches</h1>
<p [ngClass]="cn.intro">Lorem ipsum ...</p>
`,
})
export class AppComponent {
cn = {
title: $title().className,
intro: $intro().className,
};
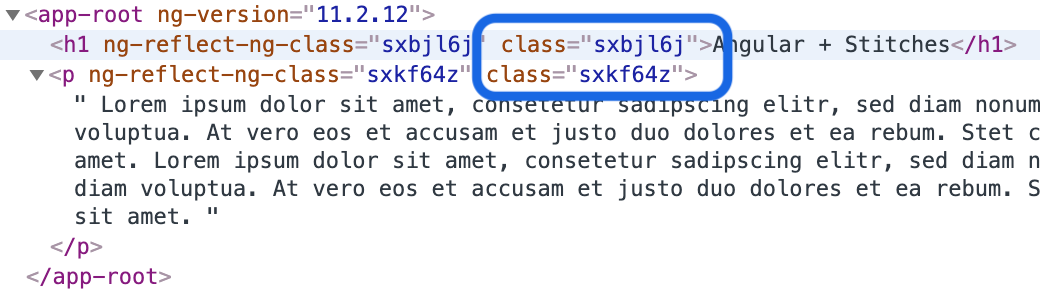
}You can then inspect the DOM and you will see that Stitches generated unique class names for our two styles:
Add a variant
Now let’s add a variant to our title. A variant allows us to style an element different depending on some properties.
const $title = css({
  // ...

  variants: {
    color: {
      text: {
        color: "$text",
      },
      primary: {
        color: "$primary",
      },
    },
  },
});
This creates a variant named color that accepts either text or primary.
We then need to pass the variant to the $title function.
export class AppComponent {
  readonly cn = {
    title: $title({ color: "primary" }).className,
    intro: $intro().className,
  };
}
Now we add a toggle button and change the styling dynamically:
export class DemoOneComponent implements OnInit {
  cn = {
    title: "",
    intro: "",
  };

  private titleIsPrimary = false;

  ngOnInit(): void {
    this.buildStyles();
  }

  toggleTitleColor(): void {
    this.titleIsPrimary = !this.titleIsPrimary;
    this.buildStyles();
  }

  private buildStyles(): void {
    this.cn = {
      title: $title({
        color: this.titleIsPrimary ? "primary" : "text",
      }).className,
      intro: $intro().className,
    };
  }
}
Calling buildStyles() whenever a property has changed is cumbersome and easy to forget to call it. We can do this better by using RxJS.
Make it reactive
In a real application your styling may depend on some observables and you probably want to use the OnPush change detection strategy for better performance. Let’s improve our component to work with streams.
We change our title property from a string into an observable (and rename it to title$ because it’s a stream now). We then wrap our object into a classNames utility function that will return the className property of each style rule (more on that later).
export class DemoTwoComponent {
  // Use an observable for the current state
  private titleIsPrimary = new BehaviorSubject(false);

  // Use our classNames utility (more on that later)
  // and the observable above to create our styles
  cn = classNames({
    title$: this.titleIsPrimary.pipe(
      map((isPrimary) =>
        $title({
          color: isPrimary ? "primary" : "text",
        }),
      ),
    ),
    intro: $intro,
  });

  toggleTitleColor(): void {
    // Toggle the observable value
    this.titleIsPrimary.next(!this.titleIsPrimary.value);
  }
}
We then use the async pipe to bind the class name. If you have strictTemplates enabled you will get an error because async may return null and the ngClass directive does not accept null (see this issue on GitHub). As a workaround you can directly bind to class or use a custom notNull pipe that returns an empty string for null.
<h1 [ngClass]="cn.title$ | async | notNull">Angular + Stitches</h1>Now we can set changeDetection to onPush. Working with observables not just improves the performance but also makes the code more readable.
@Component({
  // ...
  changeDetection: ChangeDetectionStrategy.OnPush,
})
export class DemoTwoComponent {
  // ...
}
classNames utility
And here is our classNames utility function. It is just a small helper function that returns the className property of each styled expression.
function classNames<T extends StyleMap>(obj: T): ClassNameMap<T> {
  const mapped =
    // Create an array of key-value pairs
    Object.entries(obj).map(([key, value]) => [
      key,
      // If the value is an observable we use map()
      // to map to the class name. Otherwise we can
      // directly return the class name.
      isObservable(value)
        ? value.pipe(map((value) => value.className))
        : value.className,
    ]);

  // Convert the key-value array back to an object
  return Object.fromEntries(mapped);
}
Demo
The demo project is available on GitHub:
@rothsandro/angular-stitches
Summary
We used the core library of Stitches to style our Angular Component and RxJS and a litter helper function to make it reactive. CSS-in-JS provides better type-safety than (S)CSS and the default value encapsulation of Angular.
CSS Custom Properties, tokens, variants and more make Stitches a fast and pretty neat CSS-in-JS library with great developer experience.